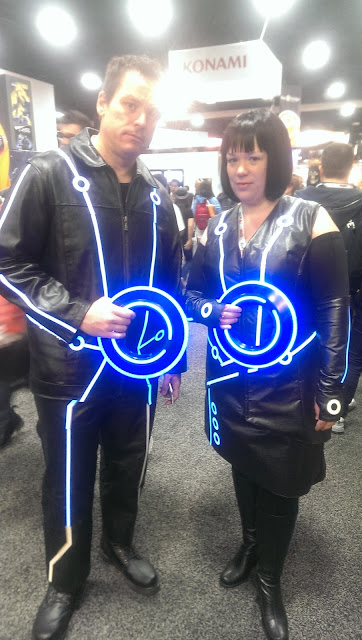
That's us on the exhibit hall floor. Adam found a picture of us on movieviral.com that was taken at night and looks pretty cool (below). We were waiting for this interminable train to pass so we could cross the street, and we thought it was such a pain but it ended up being kind of lucky!
Here's one more of us at night with an original Tron cosplayer that we found in the gas lamp district of San Diego (below). By the way, cosplay is what we are doing, it's a thing! It has it's whole own subculture that I bet you didn't even know existed. ;) (I didn't up until a couple of years ago!)
So Adam's costume was made from a leather jacket we found at a thrift store for $34. It was brown but we dyed it black and I think it turned out really good. Adam's pants were the ones he used last year for his Thor costume.
For my costume I sewed the vest, skirt, and gloves all from scratch, and it was my first time taking on my own costuming project (last year I was Padme from Episode III, but someone else made my costume, although I did make the very elaborate pin on the front of the costume). So I know where all of the little mistakes are but overall I think it turned out pretty good.
Our Dad is a wood turner, and he turned our amazing discs for us. Basically they are made of wood, epoxy, and LED lights.
Everything took us about five months from conception to finished product. When Adam first suggested Tron costumes I was like, "No way. No way I'll ever have time to do that." But the idea grew because it just sounded so cool. Early on we researched lighting possibilities, and it looked like EL wire or EL tape would be a good way to go. We decided on EL tape because it's the closest to the look in Tron: Legacy (I think it's what they actually use in the movie although they use a very sophisticated foam/latex suit that has had the EL tape custom made into it. I researched how they did it in the film).
So here are the first drawings I did of what I envisioned my costume to be like. At first I was thinking I would wear a full jacket and match Adam, but I realized that I would get too hot. You can see I was already playing with the idea of wearing a skirt. Wearing pants did not appeal to me at all, although she wears pants in the film. So I knew I wasn't going for a straight Quorra costume, it was a little bit of an elaboration on that.
This is the main image from the film that I worked off of:
Here are my second drawings where I firmed up what I was going for (below). You can see that I've decided on boots and a vest. It was hard to decide how the zipper would work down the front since there is a strip of lighting that would cross over the zipper line. The one on the left is the closest to how it turned out.
For Adam's costume, we had the pants and found the jacket before I started to figure out how his lighting would be designed, so I took pictures of him, printed them out, and drew in pencil some ideas for how the lighting would go. I mostly used pictures of Sam Flynn from the movie but I also looked at how other Tron costumers had designed their Flynn costumes.
Some primary costume design concerns were: 1. We needed to be able to go to the bathroom (I didn't want a lot of wiring going between the upper and lower pieces). 2. Flexibility and sitting down: I didn't want to be sitting on lighting or wiring and I didn't want the lighting pieces to do any extreme bending. I think we did our best and we definitely learned a lot.
I'll have to break this up into multiple posts, so next will come the actual garment construction for my costume.
Part 2: Garment Construction


1 comment:
Whoa lady...those are pretty awesome! I had no idea what a facing was...yeah, I can see why people hate doing them. Your sewing skills are just amazing!
Post a Comment